How to Setup GoHighLevel in 2024
Setup your business or agency in Go High Level, a place where you can capture, nurture, and close deals easily.

Feedbackwrench Go High Level Setup Tutorial
We provide Go High Level forour clients, and it's a rhobust CRM, email automation and calendar setup.
It does SO MUCH - but we want to help you get the basics setup.
The Feedbackwrench team will setup LOTS of this for you, and even setup the automations, but there are some things YOU need to do.
This is means to guide you through the things ONLY you can do, and then show you how to do them.
Go High Level has a TON of tutorials, so just google them to find help.
Feedbackwrench will provide coaching, help and tutorials whenever you need help.
So without further ado, here's how to get things setup in the Feedbackwrench Go High Level CRM.
Prior to setting up Go High Level, your business should have these setup:
If you're a Feedbackwrench customer, WE WILL DO THIS!
But, for those of you looking for an up-to-date Go High Level tutorial, we'll show you here.
- Google Tag Manager
- Conversion actions created
- Google Analytics
- Google Search Console created & setup
- Analytics events created
- Those events marked as conversions
- Analytics connected to Google Search Console
- Analytics connected to Google Ads
We will walk you through everything your business or agency needs to get a new client into Go High Level.
We cover Google Analytics linking, linking Facebook & Instagram, Mapping Facebook Instant Form Fields, Connecting various social medias for social posting, how to add in your Google Reviews link, and Google Calendar setup.
Create a Go High Level account with a 14 day free trial.
A little bit about us at Feedbackwrench.
Here at Feedbackwrench, our mission is to help businesses by making the web an amazing sales person for small business, so that they can fill their sales funnels with their core focus clients.
Now lets get into the meat of this post.
1 - How to Setup Google Ads & Conversions in Go High Level
A - Go to Settings - Integrations

B - Select Google Account

C - Add in your Google Business at the top under "Select Analytics Account"
D - Add in your Google G4 Property

Refresh the page after selecting the Google account, then select the Google Analytics G4 property from the drop down menu.
E - Select your Google Adwords MCC Account ID

This is the account number you find in your ads.google.com profile
Then, refresh the page as there is no "save button".
F - If you are an agency doing this for a client, then select their account under the Client section

2 - Connect Facebook & Instagram to GoHighLevel

Select the Ad account once the Facebook is linked to GoHighLevel
Refresh the page to save.
3 - How to connect Facebook forms to GoHighLevel
Go to Meta Business Suite
go to https://business.facebook.com
Click All Tools in the menu on the left

A - Create an Instant Form & Connect
Go to Instant Forms.

Create Form
Hit New Form - to create new form.
Enter in a form name, create a landscape image (1200 x 628)
Make a heading and a paragraph to go under it - keep it short and include a CTA
For the Questions on the form, try to use Contact Field questions where it will autopopulate with the Facebook users info.

Privacy - enter in a link back to your website
Completion - Maybe use a phone number, email, or website, make it personal to them and tell them what to expect next.
B - Mapping Facebook Forms in GoHighLevel
Now, after completing the Facebook Instant Form, we need to map it to the form fields in GoHighLevel

Go to Settings
Select Integrations
Select Facebook Form Fields Mapping in the top navigation bar.
Select the appropriate form and click "Map Fields" and match the fields as best as possible.

C - Create an Auto Email for Form Submissions
This will send an internal notification to an email saying someone has submitted a form.
Go to Automation in the Settings

Create a new Workflow
Then build the workflow so when a form is submitted, it triggers an internal notification

Add a filter to the Facebook Lead Form Submitted clarifying the the correct form is submitted, this will be named the one you create in Facebook.

4 - Connect Social Media Publishers to Go High Level
Head to the homepage.
In the left column go to Marketing.

A - Facebook

Select the Facebook account when logged in (easy).
B - Instagram
Search the business name in the search bar or select the business if only one is logged in.
Then click Add.

Now, click "Edit Settings"

Deselect all the other Facebook/Instagram accounts if there are multiple in there, as they are automatically all selected.
Then select the account and hit Next.
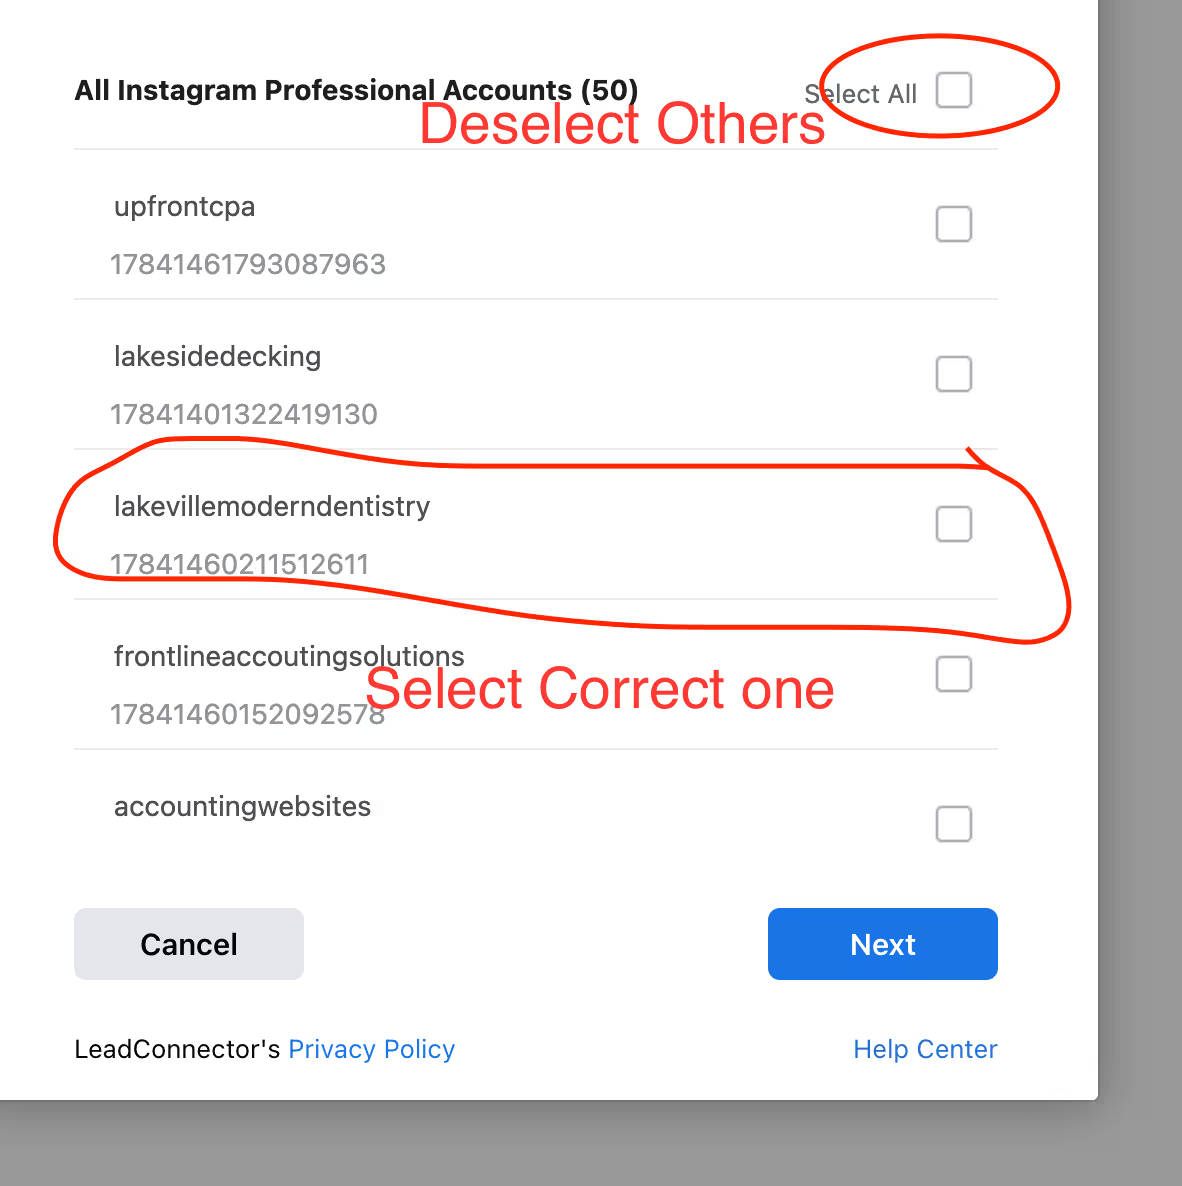
Now, once you have the professional account selected, then click Add on the Instagram account in the next screen.
It will be where "Connected" is in the next screenshot.

5 - How to add in Google Review links to Go High Level
A - Update the link to the Better Google Given "Request a Review" link
Go to the homepage.
Select Reputation
Then go to settings in the top navigation bar


Do not use Generate Link
Go to your Google My Business profile

And go to the panel that says "Get more reviews"

Copy paste that link it gives into the review text box.

B - Create a Text & Email request template
Now, create a nice kind message you can either send via email or text message to someone for a Google Review.
6 - How to add members to a Go High Level account
A - How to create admin access for a user
Add the member!
Hit the Add Team Member in the Launchpad on the home page.

Type their email in and send them an invite.

B - Turn them into Admins
Go to Settings
Select My Staff

Edit the staff person and give them appropriate access.

Select User Roles
Turn on to Admin


7 - Set up Lead Connector Mobile App
Go to mobile app in the left column from the home page.

Copy that link and send it to them, or select the team member and email it to them.
8 - Google Calendar Linking to Go High Level
A - Go to Settings
Select Integrations
IGNORE ALL EXISTING GOOGLE STUFF
Select Add Another Google Account
Do not make it primary.

B - Calendar Linking
Go to Settings
Go to Calendars
Go to Connections in the top navigation bar

Add in the Google Account
Select Calendars, then create a calendar.
Free Guides & Blog Categories
We invest heavily in helpful content that assists small businesses owners.
Book a Consultation & Grow Your Business
Book with Rob & the team to identify ways to make the web a fantastic sales & prospecting tool to sell your core services.






.avif)
.avif)
